Before You Play a Single Note
Before we talk about notes, chords, or scales, I want to say something that too many piano books skip over: this is supposed to be fun.
Somewhere along the way, learning an instrument became associated with discipline, sacrifice, and endless repetition. And while practice is certainly part of the journey, the real engine of progress is enjoyment. When you look forward to sitting at the piano, when a melody makes you smile as your fingers find it, when you lose track of time because you are so absorbed in a piece, that is when real learning happens.
So let’s begin the way all good things begin: simply, patiently, and with a spirit of curiosity.
The Pattern of Black Keys
Sit in front of your keyboard and take a moment to just look at it. You will see white and black keys stretching from left to right. The first thing to notice is that the black keys are not randomly placed. They form a repeating pattern of groups of two and groups of three, alternating all the way across the keyboard.
This pattern is your map. Run your fingers lightly over the black keys and feel the grouping: two, then three, then two, then three. Every piano in the world is laid out this way. Once you learn to see it, you will never feel lost.
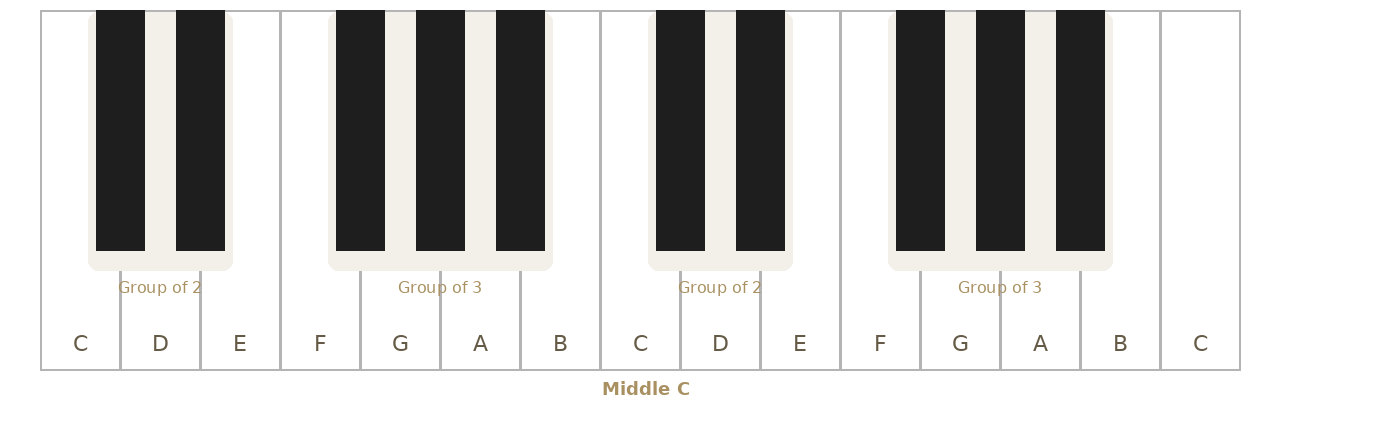
Think of the black keys as your street signs. They never move, and they always tell you where you are.
The Musical Alphabet
Music uses only the first seven letters of the alphabet: A, B, C, D, E, F, G. After G, the pattern starts over at A. This cycle repeats across the entire keyboard.
Each white key has a letter name, and you can find any note by using the black key groups as landmarks. C is always found immediately to the left of the group of two black keys. F is always immediately to the left of the group of three. These two landmarks are all you need to orient yourself anywhere on the keyboard.
Try It
Starting from the lowest note on your keyboard, find every C by looking for the groups of two black keys. Then find every F using the groups of three. Within a minute or two, the entire keyboard will feel like familiar territory.
Understanding Octaves
The distance from one C to the very next C is called an octave. The word comes from the Latin octo, meaning eight, because it spans eight letter names: C, D, E, F, G, A, B, and then C again.
When you play a C and then the next C above it, they sound like the same note, just higher. The higher note vibrates at exactly twice the frequency of the lower one. Your ear perceives them as the same pitch in a different register.
Finding Middle C
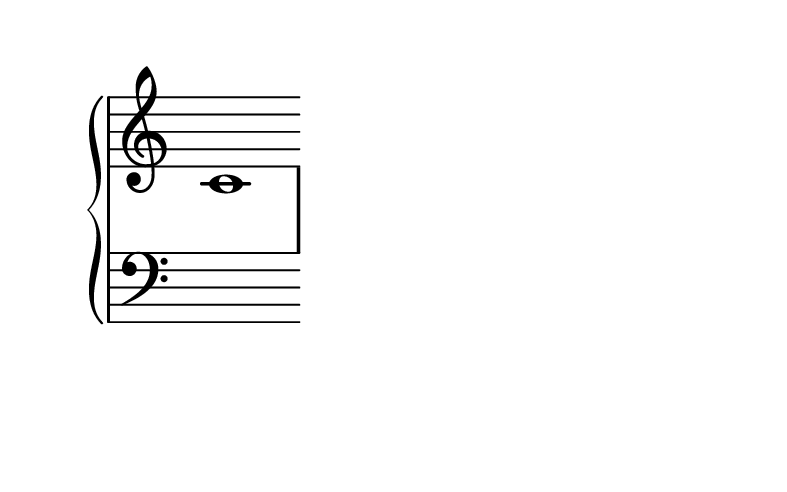
Of all the C notes on the keyboard, one is especially important: Middle C. On an 88-key piano, it sits roughly in the center. On a 61-key keyboard, it is typically the third C from the left.
Find a group of two black keys near the center of your keyboard. The white key just to the left of that group is Middle C. Press it gently. Listen. That single note is your starting point for everything that follows.
In written music, Middle C sits on a short line called a ledger line, right between the treble and bass staves of the grand staff:
Sitting at the Piano
How you sit affects everything about how you play. Sit toward the front edge of your bench, not pressed against the back. Your feet should rest flat on the floor. Your forearms should be roughly parallel to the keyboard, if your wrists are angled sharply up or down, adjust your seat height.
Keep your shoulders relaxed and down. Tension in the shoulders travels through the arms into the fingers, and tense fingers do not play well. Think of your arms as hanging naturally from your shoulders, with your hands simply resting on the keys.
Hand Position & Finger Numbers
Imagine holding a tennis ball. Your fingers curve gently, your knuckles form a soft arch, and your wrist stays level. That relaxed, curved shape is the foundation of good piano technique. Each finger contacts the key with the fingertip, not the flat pad.
In piano music, each finger has a number. Both hands use the same system: 1 = Thumb · 2 = Index · 3 = Middle · 4 = Ring · 5 = Pinky. When you see a small number near a note in sheet music, that is a fingering suggestion.
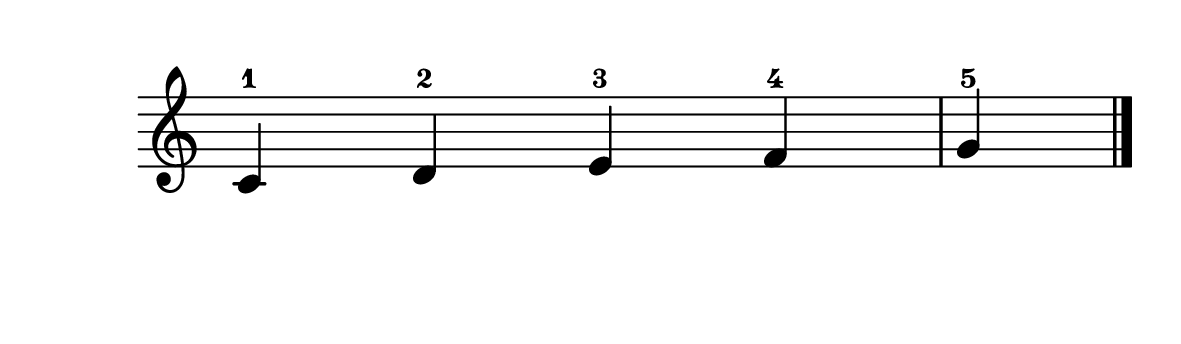
Your First Position: C Position
Right hand: Place your thumb (finger 1) on Middle C. Let your remaining fingers fall naturally on D, E, F, and G. Each finger gets one key, with your pinky on G.
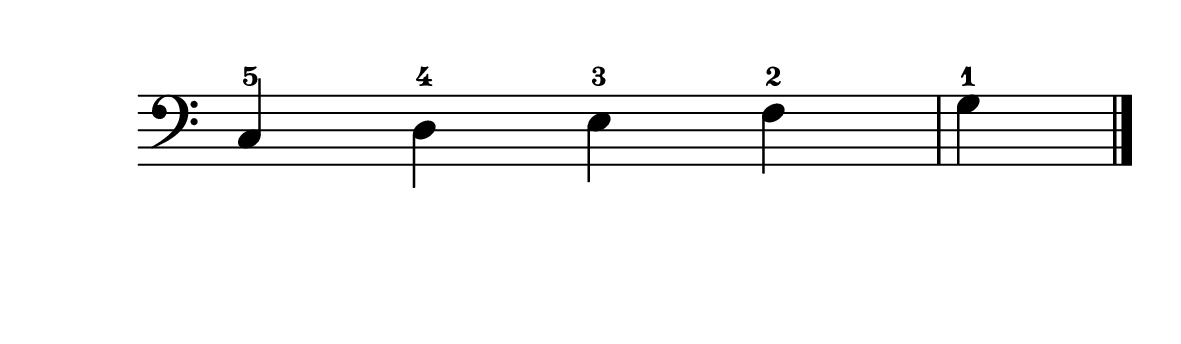
Left hand: Place your pinky (finger 5) on the C one octave below Middle C. Let your fingers fall on C, D, E, F, and G, with your thumb on G.
Your First Exercises
Exercise 1: Going Up and Coming Back
With your right hand in C Position, play C–D–E–F–G one note at a time, then come back down: G–F–E–D–C. Keep an even, unhurried pace.

Exercise 2: Left Hand Mirror
Do the same with your left hand from the C below Middle C. The fingering is reversed, you start with finger 5 and end with finger 1.
Exercise 3: Hands Together
Play C in both hands simultaneously, then both D notes, E, F, G. Come back down. If it feels awkward, slow down further. There is no shame in taking this one note at a time.
You do not need to sound good today. You just need to begin.
Building a Practice Habit
The single most important thing about practice is consistency. Fifteen minutes every day is far more valuable than two hours once a week. Set a modest goal, ten minutes is enough. Start each session with something easy to warm up. End on a positive note, playing something you are proud of.
And listen to piano music. A Chopin nocturne, a Bill Evans trio, a film soundtrack, anything that moves you. Listening with intention is part of becoming a musician.
Music is not a destination. It is a way of being.